Tutorial Level- Croft Manor
This tutorial level gives players the opportunity to explore the upgraded version of Lara's humble abode. Rewards are hidden throughout the manor, as well as Lara's gear. You can come and go to this level from the main menu whenever you want, but you cannot be accessing the rewards until you complete Level 1- Bolivia. Once you have done so, the entirety of the manor will become available to you. This walkthrough takes you through your hunt for Lara's equipment, and the 27 Rewards scattered about.
Rewards: 16 Bronze/ 10 Silver/ 1 Gold
Rewards: 16 Bronze/ 10 Silver/ 1 Gold
WALKTHROUGH:
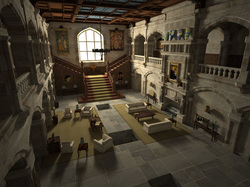
MAIN HALL: 2 Bronze Rewards/ 1 Silver Reward/ 1 Gold Reward
You begin in the main hall. Turn immediately to your left to collect a BRONZE REWARD. Enter the tech room, behind the big glass wall. On the right side of the entrance, a computer sits on the ground with a flashing green light aside the monitor. Interact with the computer to unlock the safe on the back wall. Collect the MAGNETIC GRAPPLE from the safe. Travel up the stairs for some more hidden rewards. Up the left staircase, on the wall directly to the right of the top is a secret door. Throw your magnetic grapple to the lock above, and pull. Once it is all the way out, the door will open revealing a BRONZE REWARD. On the other set of stairs is another similar mechanism, except you need the Pistols for this one. With the pistols, shoot the lock three times to open the secret door in the wall that has a SILVER REWARD. Back in the other hall at the top of the grand staircase,follow this hallway in the direction of the tech room. At the end of the hall is an open ledge facing the tech room wall. Use your magnetic grapple to pull the three horizontal bars down. Turn to the nearby door and enter.
LARA'S BEDROOM: 1 Bronze Reward
Follow the hall to Lara's bedroom. Inside there is a bronze plate fixed into the wall. Pull the two levers nearby down to open the plate, with Medusa's face embedded upon it, to reveal Lara's PISTOLS. Use the Interact button to collect the pistols. Behind Lara's bed, further in the room, is a BRONZE REWARD. Inside Lara's closet you can access and wear any outfits you've collected thus far in the game. Next is the pool room. On the left side of the tech room entrance, back in the main hall, is a door. Go through the door, down the turning hall, and into the pool room.
POOL ROOM: 4 Bronze Rewards/ 3 Silver Rewards
Once inside, pull out the fish statue fixed into the wall to your right. On the left side of the pool opposite the first fish statue is another statue. Pull this one out, collect the BRONZE REWARD behind it, and push the statue to the edge of the pool. Note that if you stand on the edge of the statue and jump out, while rapidly pressing the grapple button, you may be able to jump straight up to the overhanging greenery, and swing straight to the silver reward. Inside the pool, you can collect another BRONZE REWARD. A lever is located inside the pool. Pull it while underwater to open the first of two gates inside the pool wall. There are four statues of goddesses with spears and shields around the pool. Make sure that the spears are all pulled out as far as they can go by using the magnetic grapple. Near the pool, inside the small alcove with two beach chairs, a BRONZE REWARD is hidden behind them. Locate the third fish statue near then alcove with three beach chairs, pull it out, and then vault on top. Jump to the spear and swing to the balcony ledge, shimmying to the right and backwards jumping onto the top of a fish statue pillar. Jump to the spear, and then to the diving board platform that overlooks the pool. Collect the BRONZE REWARD on the diving board. Now pay attention to the two statues with spears. Rotate each so that their spears touch each other, and a golden plate on the wall will spin around revealing a golden face. Interact with it to open the second gate inside the pool. From the other side of the high platform, jump to the spear, and then throw your magnetic grapple to swing to the next spear, and consecutively to the next high platform. Pick up the BINOCULARS on the statue with the horse. Behind the statue of the fish that doesn't have a movable ball, pick up the SILVER REWARD. On top of the fish statue near where you jumped onto the platform is a stone ball with a golden ring. Pull it off and position it on the circular pressure pad in front of the nearby diving board. This will lower the aforementioned overhanging greenery. Use your magnetic grapple to pull it close to you, and then jump to it on its return swing. Once it slows down, face the balcony with the reward on it, throw your magnetic grapple and pull yourself close to it, jumping onto the platform and collecting the SILVER REWARD. Dive into the pool and enter through the opened grates. Collect the SILVER REWARD, and then swim towards the golden grate at the end of the tunnel. It will open into the Gym pool automatically.
LARA'S GYM: 6 Bronze Rewards/ 3 Silver Rewards
Inside the Gym pool is a BRONZE REWARD hidden in the bottom. Swim down and collect it. The first obstacle begins on the right side of the Gym entrance. Primarily, use your magnetic grapple to pull the rotating horizontal pole with the golden ball so that it is parallel to the two-sloped surface against the wall. Now take a running jump to the horizontal pole, swinging to the vertical pole, and then onto the rotating pole you moved just before. Swing to the sloped surface. Almost immediately, you'll need to jump to the rocky pillar. Vault up to the higher ledge, and then backwards jump to the hanging pole. On the second pole, drop to the second sloped surface and jump into the hollow containing the BRONZE REWARD. Now, backtrack to the second hanging pole. From here, jump to the small rock wall in the Gym corner, and shimmy around the ledge, backwards jumping to another rocky pillar. Jump to the horizontal pole underneath the platform with the silver reward, and swing to the hanging pole. You will need to shimmy to the left, first. From this pole, jump to the second pole that rises from the pool, and then to the ledge on the rocky wall. Shimmy onto the rocky pillar, and drop to the ledge below. Backwards jump onto the short horizontal pole, and swing to the ledge in the corner pillar. Jump to the left and grab the pole. Jump to the mounted pole on the wall, and then to the left onto the rocky ledge above the platform with the silver reward. Drop to the platform. Collect the SILVER REWARD. Alternatively, this platform can be reached by holding in the jump button for an extended jump from the edge of the pool. Next, backtrack to the ledge in the pillar above the sloping platforms. Instead of backwards jumping onto the poles, shimmy around the bottom ledge on the rocky pillar, and jump to the left onto the vertical pole. Jump to the mounted pole on the rock wall, and then to the ledge on the right. Jump to the ladder, and then from the top, jump from the mounted pole to the hollow containing a BRONZE REWARD. Back at the ladder, jump to the ledge on the rock wall to your right. From here, jump to the corner rock pillar, shimmy around the ledge, and jump backwards onto the pole above the ledge with the next reward. Drop to the jutting ledge below, but make sure Lara is facing the rocky corner pillar. Drop to the ledge, shimmy to the hollow, and collect another BRONZE REWARD. Next, open the mounted ladder, and backtrack back to it. Climb onto the opened ladder, and then jump right to the moving platform. Once you land on it, it will move closer towards a stationary, suspended platform with a SILVER REWARD. From here, jump to the horizontal pole near the rocky pillar with green rocks. Swing to the pole, directed towards the nearest corner of the Gym, and then from that pole to the ledge in the wall. Shimmy around the crevice to your right, drop to the hollow ledge, and then grab a BRONZE REWARD. Next, make sure that the movable wall above the platform above the Gym pool is opened. Locate the small, vertical rock near the back of the gym, climb onto the ledge and backwards jump to the horizontal bar, to the pole, to the u-shaped, movable pole. Swing to the mounted pole on the wall. Jump to the ledge on your right, shimmy around the two corners, drop to the slope, jump to the ledge, climb the green rocks. Jump to the ledge on your right, backwards jump to the suspended, angled horizontal pole. Swing through the next two poles, landing on the suspended platform. Once on the platform, use your magnetic grapple to pull the platform to the alcove with a SILVER REWARD. We still have one more reward. Make sure that the movable rock face on the wall is closed, and then backtrack to it (near the angled pole that allows you to reach the highest silver reward). Swing across the two poles above the Gym pool, and grab the ledge on the corner wall. Shimmy into the alcove and collect the Gym's final BRONZE REWARD. Congratulations! You've mastered Lara's Gym!
THE LIBRARY: 2 Bronze Rewards/ 1 Silver Reward
In the hallway atop the left side of the grand staircase, the first door on your right leads you down a hall to the Library where Alister sits behind a desk stacked with multiple books around him. First thing is first, throw your magnetic grapple at the higher bookshelf and pull it down so that a cart of books falls to the ground. Position the carts onto the pressure plate near the white sofa chair. The PLS sits on Alister's desk. Now, look at the loose boards on the right side of the Library entrance. Shoot them with your pistols. Inside is the second book cart to weigh the second pressure plate near Alister's desk, as well as a SILVER REWARD. Having both pressure plates weighted down opens the door to the Secret Passageway. We'll come back to this later. Go up the steps and enter the study. Pick up the BRONZE REWARD. in the corner. Pull the lever in the room's opposite corner to open a secret hollow behind the bookcase concealing a BRONZE REWARD. We'll be returning through most of Croft Manor for the Gold Reward Challenge. Return down the stairs and enter the Secret Passageway.
SECRET PASSAGEWAY: 1 Bronze Reward/ 1 Silver Reward
Collect the SILVER REWARD at the base of the stairs. On the right, near the reward, is a golden face carved into the wall. Interact with it to begin the Gold Reward Challenge, which is detailed below in a separate section, unlike the walkthroughs for previous levels. At the base of the same wall with the golden face, inside a crate, is a BRONZE REWARD. Pick it up, and continue through the hall. Up a set of steps, another golden face prompts you to use the Interact button, revealing a secret door that opens into Lara's Bedroom.
GOLD REWARD CHALLENGE
CLUE #1: SECRET PASSAGEWAY
"Above the Waters, Twin Sisters turn their backs one upon the other to leave the Ambages unguarded."
Solution: Return to the platform in the Pool Room with the two statues that had the touching spears. Rotate them so their backs are facing each other. Once their backs are turned, the golden face will rotate revealing the next clue.
CLUE #2: POOL ROOM
"Within the Hall of Knowledge, Tomes of Cerulean, Topaz, Viridian and Crimson in turn reveal their Arcanum"
Solution: In the Library, four books stick out of four different bookcases. The trick is to Interact with them in the order they were listed. The first is the one on the bookcase by the breakable boards and Library entrance, the second is inside the Study, the third is on the balcony overlooking the Library, and the last one is the red book down between the two mounted shields with crosses. Open them in the correct order and two bookcases will separate revealing a SILVER REWARD and the next clue.
CLUE #3: LIBRARY
"Above the Hearth, revealed Visage and countenance touched in haste raise up the Steward."
Solution: Back in the Main Hall, on the two raised halls overlooking the ground floor, two golden faces. If you did not already pull the bars down on the tech room wall, do so now. You are timed for this next part. Quickly interact with one of the golden faces, and then swing across the horizontal bars to the next one, touching it before the timer runs out.
CLUE #4: MAIN HALL
"The risen Athena turns to face the Sun, whose burden then reveals the Golden Laurel."
Solution: Direct the risen Athena statue towards the sunlight in the room, above the grand staircase, and step on the pressure pad at the base of the staircase. Once you do so, the Athena statue will vanish and a pillar will raise in front of the tech room wall with the final reward. Return to the horizontal poles up on the tech room wall. On the middle pole, shimmy to the left, and then drop onto the platform with the GOLD REWARD. Once you collect it, the pillar will lower once more and you are free to move about the manor. Nice work in finding one of the most "puzzling" rewards in the game!
To First Level: Level 1- Bolivia
