Level 2 - City of Vilcabamba
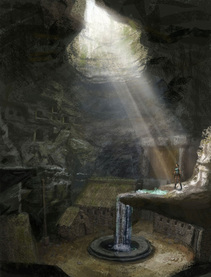
Stumbling out of the Mountain Caves of Peru, Lara has opened the gates to the lost city of Vilcabamba, a cavernous city of decrepit buildings, bears, bats, and a nice waterfall to boot. She's one step further in her quest to find the first piece of the Scion.
Level Objective: Progress through the lost city and find the entrance to the Scion's resting place.
Artifacts: 1
Relics: 0
Level Objective: Progress through the lost city and find the entrance to the Scion's resting place.
Artifacts: 1
Relics: 0
BEGINNING HALL W/ BEAR
Progressing down the hall causes a nasty bear to sense you nearby. He'll come out of the arched doorway, and a small text will come up instructing you on how to perform an adrenaline shot to an enemy. Once you've dispatched the bear, proceed to the next chamber.
HALL W/ BROKEN FLOOR AND VERTICAL POLES- 1 Small Medipack
You'll come across a hall with a collapsed floor, and two vertical poles stretching from the ground to the ceiling. Jump to the first pole and slide down to the ground. Behind the nearby rocks is a SMALL MEDIPACK. You can use the ledges on the wall to reach the second pole, or jump straight from the raised rock behind it to grab onto the very bottom. Regardless of which way you choose, you can now climb to the top and jump into the next hallway. A sudden change of scenery is followed by the level title which will appear across your screen, once you pass through the two wooden doors to Vilcabamba.
VILCABAMBA COURTYARD- 1 Artifact
Pass down two flights of steps, fighting of the two wolves at the bottom on the level with the two, tall pillars. Proceed to the courtyard, where a bear will surprise you from behind a house! Dispatch it. Jump into the square, courtyard pool. The only way to bypass this tunnel without drowning is by using the fast-action button. Pull the lever in the submerged tunnel wall, opening the air pocket above. Climb into one of the Vilcabamba houses.
Notice the high-tech "doorknob" nearby. And apparently, the pool you just exited was once a toilet, shower, and bath tub. Lovely. Pull the switch near the door to make a shortcut back, in case you fall during this next part. Go up the stairs inside the house, and jump across the gap into the stables. The planks hanging off the edge will fall to the ground, but don't worry, as you won't take any damage. Once inside, lock onto the lock that holds the stable doors shut. Fire, to create another shortcut back to the courtyard. Now pull the crate in the small hollow out, just below the raised alcove containing a SMALL MEDIPACK. Now push the crate back, and inwards into what I imagine as a meeting hall. Collect the SHOTGUN AMMO, and VILLAGE KEY, from the first floor. Climb onto the crate, and consecutively to the second floor. Collect the SHOTGUN AMMO and SMALL MEDIPACK. To make a detour for this level's only artifact, see "Artifact Detour" below. To continue, backtrack to the courtyard. Find the switch and door between two stone buildings, and use the Village Key
Artifact Detour: Pull the crate from inside the stables out to the courtyard. Push it in front of the vertical pole between the stone building with two doors and the empty stone hut. Use the crate to climb onto the pole. Shimmy to the top of the pole, and then quickly jump to the ledge on the mossy wall, and pull yourself up onto the high, stone platform. Dispatch the bat that attacks you (stupid vampire bat...). Jump to the horizontal pole, and then to the higher, rocky platform. Kill the bat that attacks you from here. Take a brief moment to enjoy the scenery of the lost city of Vilcabamba. Turn to face the giant, stone archway, jump off the platform, throw your grapple, and swing to the ledge on the other side of the cave. Shimmy to the left, and traverse the two poles to the high, waterfall pool with the ARTIFACT. You may also wish to fight the pesky bat that lurks nearby. Jump into the square pool in the courtyard, and backtrack back to the surface. The scary wolves cry out as the door lowers. Exit the village courtyard.
GREAT CHAMBER W/ TWO TOWERS AND DOOR-LOCKING MECHANISMS
First, dispatch the three wolves inside the great chamber. Use the adrenaline shot as needed. For the left tower, see the section called, "Left Tower". Vice versa for the left tower. The goal of the great chamber is to climb the two towers, and unlock the door to the next level.
LEFT TOWER
Enter the left tower. Follow this sequence to ascend the tower. Stairs to mounted platform, platform to ledge, jump to the ledge on the right, backwards jump to staircase balcony overlooking square pool at the base of the tower, use saving grab. Enter the sloping staircase, at the top, shoot the three bats. Jump across the gap to the second platform. Exit the tower, and jump to the wooden, horizontal peg on the side of the pillar. This pillar is one of two locking mechanisms. Drop to the ground below. Climb down the ledges that are above the two entrances to the towers.
RIGHT TOWER- 1 Small Medipack
Grab the SMALL MEDIPACK in the square pool at the base of the tower. Follow the sequence to ascend the tower. Follow the stairs, jump to the ledge, vault up the two higher ledges, shimmy to the left, jump to the ledge on the perpendicular wall, shimmy around, and climb atop the sloping stairwell balcony. Follow the slope up to the higher balcony. Kill the two bats. Jump across the gap and exit the tower. Jump to the second wooden peg, connected to the wooden pillar mechanism.
Once you have unlocked the doors, climb back down, and enter the ruined corridor.
FIRST RUINED CORRIDOR- 1 Shotgun Ammo
Follow the corridor down to the hall with the broken floor. Jump across a gap to a small platform with a slope. Slide down the slope, and to the floor. Be weary of the wolf at the bottom. Once you have dispatched him, collect the SHOTGUN AMMO on the ground. Pull the crate out of the alcove in the nearby wall, and push it up against the wall below the entrance to this hall. Vault up to the entrance, again, slide down the slope, and this time, grab the horizontal pole, swinging to the intact platform in the center of the hall. Jump onto the top of the vertical pole, and consecutively to the other side of the hall.
SECOND RUINED HALL W/ SHOOTING DARTS
You'll arrive at another ruined hall. Jump down inside, and locate the stone debris below a ledge on the wall. Vault onto the ledge, shimmy to the right, and perform a backwards jump to a horizontal pole. Swing to the ledge on the parallel wall, vault up, and shimmy around the corner to the left onto the intact platform with the shooting darts. Time pulling yourself up, and then when out of harm's way (are you ever?), jump to the vertical pole in the direction from which you just climbed. Jump to the platform on the other side of the hall. Continuing down this hall will end the level.
Last Level: Mountain Caves Next Level: The Lost Valley
