LEVEL 1: BOLIVIA
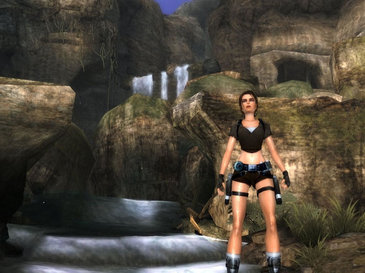
When a friend of Lara's informs her that an ancient structure Lara has been searching the world for has appeared in Bolivia, Lara heads off right away. The level begins with two cutscenes. The first is a flashback of Lara's tragic plane crash in the Himalayas, the second is of her climbing to the lost city of Tiwanaku, Bolivia. The level begins with Lara on the cliff side, peering at a seemingly impossible to reach waterfall in the distance.
Level Objective: Explore the ruins of Tiwanaku for the lost dais.
Rewards: 10 Bronze/ 5 Silver/ 1 Gold
Level Objective: Explore the ruins of Tiwanaku for the lost dais.
Rewards: 10 Bronze/ 5 Silver/ 1 Gold
WALKTHROUGH:
CLIFF SIDE- 2 Bronze Rewards
To begin, walk Lara forward from her starting position. To the left, under the stone archway, you can collect a BRONZE REWARD. Head back out and turn left to go up the stone ramp. Jump across the gap to reach the other side. Turn left and continue down the small hill. Stop around halfway and look at the large rock wall to your right. Inside a little hollow rests a BRONZE REWARD. Collect it and then head down to the pool of water nearby. Jump into the pool and swim to the low platform on the other side. Press the jump button to climb up and then climb the adjoining rock wall where a cutscene will ensue. Zip talks to Lara about her waterproof PDA. Up ahead is an interactable boulder. Grab the boulder and push it off the side of the cliff to continue. Jump across to the rock platform, under which you collected the first bronze reward and jump onto the green vine built into the cliff face. Climb to the top and jump to the second vine on your right.
DARK TUNNELS INSIDE WATERFALL- 1 Silver Reward
You land on a rocky ledge. Follow the ledge to the end where you will see a vine swinging in front of the waterfall. The camera will default your view towards the waterfall, but to get the next secret, you'll need to turn Lara to her left to find a secret cave entrance built into the wall. Activating your PLS should help you if you are having trouble seeing the entrance. Swing and jump into the cave and follow the path to your first SILVER REWARD. Collect it and then safety drop down from the ledge in front of the reward to enter the second cave/ tunnel. Had you swung through the waterfall on the vine, you would've made it to this spot, although the ledge leading to the reward would've been unreachable.
TUNNEL EXIT AND WATERFALL EXTERIOR
Turning into the tunnel (opposite from the entrance where the waterfall is visible), continue through where you will find a gap leading to a higher ledge. Jump to the higher ledge and a quick sequence will show you the route to above the waterfall. Grab the ledge on the wall nearby, and shimmy along the entire way until the ledge ends. If you move your camera, you should be able to see the top of the waterfall. Jump backwards and then vault onto the top. Take a moment to glance over the top of the waterfall at the first series of obstacles in the game. Off in the distance you will see high plateaus that stretch above the clouds, directly below you you can see the pool that you swam through before the PDA cutscene. Now it's time to travel up along the stream. Halfway along, a trigger will activate and a boulder will roll towards Lara. Run forward and to the right to a small area where one rock sits on top of another, and sit tight until the boulder rolls by. The boulder will eventually roll off the waterfall and into the pool below.
STREAM WITH SUSPENDED POLE
Entering the next area through the new entrance (where the boulder once stood), Lara will find herself back in a stream that runs between high rock walls. On the right, in the water, is a rock slab situated beneath a wooden pole that hangs above. Run onto the stone slab, jump, and grab the pole. Shimmy left along the pole as far as you can go, and then swing to the smaller wooden pole that is between you and the tiny waterfall. From the smaller pole, swing onto the ledge next to the waterfall. Shimmy to the right, and then jump across the waterfall to the ledge on the other side. You will need to make a saving grab here. After you do, a cutscene shows a mercenary on the path above the tiny waterfall who is talking on his radio.
LARGER STREAM WITH TWO TINY WATERFALLS
After the cutscene, you will already be on the path above the tiny waterfall. Shoot the mercenary before he sees you. Turn the corner of the bend and notice the rock that sits in the middle of the middle of the stream. On the right of this rock is a decrepit tree, which we shall toy with in a few seconds, and on the left, you can turn your head to see another bronze reward against the rock wall. Collect it, and then proceed behind the aforementioned rock where you will see the first piece of the ruins of Tiwanaku, an L-shaped wall, perfect for climbing. Grab the ledge on the patch of dirt that sits in the corner of the ruined wall and rock wall, shimmy around the corner, and then vault up to the ledge above. Climb on top of the ruined wall where you will find another boulder sitting precariously on the edge. Push it off, and watch the following sequence as the force from the fallen boulder on the decrepit tree makes a makeshift pole for you to access. Go back to the rock that is in the middle of the stream, back down in the water, and use the makeshift pole to swing across to the next area.
ENTRANCE TO TIWANAKU RUINS
A shiny, circular stone slab blocks the entrance to the next area. With the respective buttons, attach your grapple and pull down the slab which will shatter upon hitting the ground. Entering through the new doorway will trigger a cutscene where two new mercenaries arrive on scene, looking for Lara. Quickly shoot them down, rolling while shooting one to avert the other's gunfire. Water falls down from the wall ahead. On the wall with the falling water, run up the rocks and grab the ledge underneath the falls. Shimmy fast to avoid the collapsing piece of ledge, or if you fall, the two remaining bits of ledge allow Lara to jump from one to the other. On the second ledge, lean backwards and jump to the pole that sticks out from the ruined wall. Rotate your camera to face a ledge on a jutting-out wall. Swing over to the ledge. Shimmy around the corner of the ledge, and jump left to grab a ledge in the nearby wall. Vault up to the next ledge, and then climb onto the above platform. Enjoy the nice scenic environment, the cascading waterfalls which are the source of all the water you've seen thus far, as well as large ruined walls, and two stone archways that stand out bold against the midday sun.
VINE OVER GAP AND RAISED POLES- 1 Bronze Reward
Turn to face the waterfall and run and grab the vine. For a reward, turn to the left, and in a small hollow in the wall behind the falling water hides the prize. Turn Lara about thirty degrees to her right (the camera turns left), swing as high as you can, and then jump through the waterfall and into the hollow to obtain a BRONZE REWARD. Exit the hollow by safety dropping to the skinny ledge below, turn right and follow it onto a larger platform. Following the rock wall on the left, Lara will now be facing two poles that stick out from mounted stone heads in the ruin wall. Jump and grab the first pole, swing to the second, and last to the stone platform on the other side of the large gap.
HIGH GAP OVER STREAMS AND RUINED STRUCTURE- 1 Bronze Reward
Be ready once on the other side. You will be fighting off another mercenary that will appear from around the corner after your first few steps. Dispatch him, then turn right along the path where you will be faced with a gap; the streams are visible below. Stairs into the ruins are visible on the other side of the gap, which once was most likely a bridge. Run, jump, and throw your magnetic grapple and swing across to the other side. Following the stairs up, Lara will be in the shade of what looks like a ruined Tiwanaku hall. Turn right and use your camera to locate the BRONZE REWARD situated up on an unreachable ledge. Throw your magnetic grapple and press the pull button to collect it. Turn right and travel down the ruined hall. At the end, make a left a follow the path until the cutscene where Lara sees the intact ruins which are infested with mercenaries. As instructed, use your Environmental Hazards button to release the rocks and send them tumbling into the mercenaries below.
OUTSIDE THE TEMPLE- 2 Bronze Rewards/ Silver Rewards
If you were unable to kill both of the mercenaries on the ground with the boulders, fire your pistols as you slide down the slope. You are now unable to access all of the previous areas unless you replay the level, later. Two mercenaries were at the base of the slope. Dispatch them. As you progress forward, two more mercenaries appear. One is on the ground near Lara, the other is standing on a ledge behind the first. Shoot them down. From the base of the cliff, follow the rocky wall on the right down into a narrow space where a BRONZE REWARD sits perched behind a boulder. Exiting the space, follow the nearby path up to the top of the path that slopes around, upward. Shoot the mercenary. Before grabbing the vine, drop to the ground below the ledge where the mercenary was. Turn around so Lara's back is facing the ledge you just climbed down from. Follow the rocky wall directly in front of Lara to the right along a path between a ruined wall and a rocky wall where you will find another BRONZE REWARD. You could also have climbed the ledge that the mercenary near the base of the slope was and followed the path back to this spot. Both ways are available, depending on your preference. Return to the last ledge you descended, and climb back up. Get on the vine, and climb the vine before swinging to the other side. If you don't climb, Lara will drop to the ground and not be able to reach the other side of the gap, unless you are swinging at maximum speed. At the top of the ledge, slide down the next slope and have your guns ready. Using your environmental hazards button, you can shoot the pillar which will topple down on one of the two mercenaries. Kill the other while using appropriate moves to dodge. Across the fallen stone pillar awaits a mercenary. Kill him and then turn right towards the black SUV. Two mercenaries wait to be greeted by Lara's guns on the right of the SUV. Instead of ascending the steps of the Temple, climb atop the ledge that is directly left on the stair railings. Climb the second ledge and then turn left. Hidden inside a secret hollow is an interactable wall. Fire at it and it will crumble revealing a SILVER REWARD. Now climb the stairs and a cutscene will show two chicken mercenaries fleeing into the Temple, moments before they scream from a mysterious death.
TEMPLE ENTRANCE HALL- 1 Bronze Reward
Enter the temple through the entrance atop the stone staircase. Follow a short flight of steps down to a dusty floor where two small, interactable rocks wait to be kicked so as to reveal the trap, and a shiny hook up above foreshadows using the grapple. The floor ahead retracts and reveals spinning spike poles. Falling from your grapple or not making the jump across will result in immediate death. Swing to the other side. Activating the PLS is a good idea now that you're inside the Temple. Follow the few steps up into the next chamber. Before entering the chamber where several chains are visible, turn to the left and traverse the crumbled passage tucked in the left corner. Inside the crumbling room is a BRONZE REWARD. Leave the crumbling passage and enter the room with chains. A short sequence will ensue showing the way up and out.
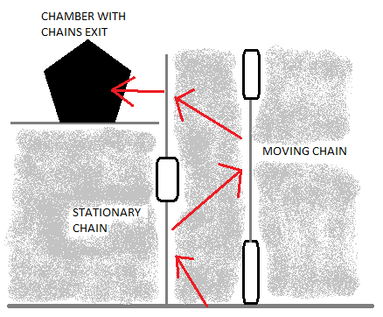
CHAMBER WITH CHAINS AND CLANKING SOUNDS
For this sequence, you can refer to my below diagram. The only accessible chain from the ground level does not move while Lara is on it. Climb onto it, and climb as high as you can before you come to the block that prevents you from going further. The next segment here is timed. Jump backwards onto the MOVING CHAIN, which will begin to lower. Use the fast-motion button to assist you in climbing the chain faster. Climb up to the block on the MOVING CHAIN, and then jump backwards again onto the STATIONARY CHAIN. From there, jump onto the platform to exit the chamber.
To begin, walk Lara forward from her starting position. To the left, under the stone archway, you can collect a BRONZE REWARD. Head back out and turn left to go up the stone ramp. Jump across the gap to reach the other side. Turn left and continue down the small hill. Stop around halfway and look at the large rock wall to your right. Inside a little hollow rests a BRONZE REWARD. Collect it and then head down to the pool of water nearby. Jump into the pool and swim to the low platform on the other side. Press the jump button to climb up and then climb the adjoining rock wall where a cutscene will ensue. Zip talks to Lara about her waterproof PDA. Up ahead is an interactable boulder. Grab the boulder and push it off the side of the cliff to continue. Jump across to the rock platform, under which you collected the first bronze reward and jump onto the green vine built into the cliff face. Climb to the top and jump to the second vine on your right.
DARK TUNNELS INSIDE WATERFALL- 1 Silver Reward
You land on a rocky ledge. Follow the ledge to the end where you will see a vine swinging in front of the waterfall. The camera will default your view towards the waterfall, but to get the next secret, you'll need to turn Lara to her left to find a secret cave entrance built into the wall. Activating your PLS should help you if you are having trouble seeing the entrance. Swing and jump into the cave and follow the path to your first SILVER REWARD. Collect it and then safety drop down from the ledge in front of the reward to enter the second cave/ tunnel. Had you swung through the waterfall on the vine, you would've made it to this spot, although the ledge leading to the reward would've been unreachable.
TUNNEL EXIT AND WATERFALL EXTERIOR
Turning into the tunnel (opposite from the entrance where the waterfall is visible), continue through where you will find a gap leading to a higher ledge. Jump to the higher ledge and a quick sequence will show you the route to above the waterfall. Grab the ledge on the wall nearby, and shimmy along the entire way until the ledge ends. If you move your camera, you should be able to see the top of the waterfall. Jump backwards and then vault onto the top. Take a moment to glance over the top of the waterfall at the first series of obstacles in the game. Off in the distance you will see high plateaus that stretch above the clouds, directly below you you can see the pool that you swam through before the PDA cutscene. Now it's time to travel up along the stream. Halfway along, a trigger will activate and a boulder will roll towards Lara. Run forward and to the right to a small area where one rock sits on top of another, and sit tight until the boulder rolls by. The boulder will eventually roll off the waterfall and into the pool below.
STREAM WITH SUSPENDED POLE
Entering the next area through the new entrance (where the boulder once stood), Lara will find herself back in a stream that runs between high rock walls. On the right, in the water, is a rock slab situated beneath a wooden pole that hangs above. Run onto the stone slab, jump, and grab the pole. Shimmy left along the pole as far as you can go, and then swing to the smaller wooden pole that is between you and the tiny waterfall. From the smaller pole, swing onto the ledge next to the waterfall. Shimmy to the right, and then jump across the waterfall to the ledge on the other side. You will need to make a saving grab here. After you do, a cutscene shows a mercenary on the path above the tiny waterfall who is talking on his radio.
LARGER STREAM WITH TWO TINY WATERFALLS
After the cutscene, you will already be on the path above the tiny waterfall. Shoot the mercenary before he sees you. Turn the corner of the bend and notice the rock that sits in the middle of the middle of the stream. On the right of this rock is a decrepit tree, which we shall toy with in a few seconds, and on the left, you can turn your head to see another bronze reward against the rock wall. Collect it, and then proceed behind the aforementioned rock where you will see the first piece of the ruins of Tiwanaku, an L-shaped wall, perfect for climbing. Grab the ledge on the patch of dirt that sits in the corner of the ruined wall and rock wall, shimmy around the corner, and then vault up to the ledge above. Climb on top of the ruined wall where you will find another boulder sitting precariously on the edge. Push it off, and watch the following sequence as the force from the fallen boulder on the decrepit tree makes a makeshift pole for you to access. Go back to the rock that is in the middle of the stream, back down in the water, and use the makeshift pole to swing across to the next area.
ENTRANCE TO TIWANAKU RUINS
A shiny, circular stone slab blocks the entrance to the next area. With the respective buttons, attach your grapple and pull down the slab which will shatter upon hitting the ground. Entering through the new doorway will trigger a cutscene where two new mercenaries arrive on scene, looking for Lara. Quickly shoot them down, rolling while shooting one to avert the other's gunfire. Water falls down from the wall ahead. On the wall with the falling water, run up the rocks and grab the ledge underneath the falls. Shimmy fast to avoid the collapsing piece of ledge, or if you fall, the two remaining bits of ledge allow Lara to jump from one to the other. On the second ledge, lean backwards and jump to the pole that sticks out from the ruined wall. Rotate your camera to face a ledge on a jutting-out wall. Swing over to the ledge. Shimmy around the corner of the ledge, and jump left to grab a ledge in the nearby wall. Vault up to the next ledge, and then climb onto the above platform. Enjoy the nice scenic environment, the cascading waterfalls which are the source of all the water you've seen thus far, as well as large ruined walls, and two stone archways that stand out bold against the midday sun.
VINE OVER GAP AND RAISED POLES- 1 Bronze Reward
Turn to face the waterfall and run and grab the vine. For a reward, turn to the left, and in a small hollow in the wall behind the falling water hides the prize. Turn Lara about thirty degrees to her right (the camera turns left), swing as high as you can, and then jump through the waterfall and into the hollow to obtain a BRONZE REWARD. Exit the hollow by safety dropping to the skinny ledge below, turn right and follow it onto a larger platform. Following the rock wall on the left, Lara will now be facing two poles that stick out from mounted stone heads in the ruin wall. Jump and grab the first pole, swing to the second, and last to the stone platform on the other side of the large gap.
HIGH GAP OVER STREAMS AND RUINED STRUCTURE- 1 Bronze Reward
Be ready once on the other side. You will be fighting off another mercenary that will appear from around the corner after your first few steps. Dispatch him, then turn right along the path where you will be faced with a gap; the streams are visible below. Stairs into the ruins are visible on the other side of the gap, which once was most likely a bridge. Run, jump, and throw your magnetic grapple and swing across to the other side. Following the stairs up, Lara will be in the shade of what looks like a ruined Tiwanaku hall. Turn right and use your camera to locate the BRONZE REWARD situated up on an unreachable ledge. Throw your magnetic grapple and press the pull button to collect it. Turn right and travel down the ruined hall. At the end, make a left a follow the path until the cutscene where Lara sees the intact ruins which are infested with mercenaries. As instructed, use your Environmental Hazards button to release the rocks and send them tumbling into the mercenaries below.
OUTSIDE THE TEMPLE- 2 Bronze Rewards/ Silver Rewards
If you were unable to kill both of the mercenaries on the ground with the boulders, fire your pistols as you slide down the slope. You are now unable to access all of the previous areas unless you replay the level, later. Two mercenaries were at the base of the slope. Dispatch them. As you progress forward, two more mercenaries appear. One is on the ground near Lara, the other is standing on a ledge behind the first. Shoot them down. From the base of the cliff, follow the rocky wall on the right down into a narrow space where a BRONZE REWARD sits perched behind a boulder. Exiting the space, follow the nearby path up to the top of the path that slopes around, upward. Shoot the mercenary. Before grabbing the vine, drop to the ground below the ledge where the mercenary was. Turn around so Lara's back is facing the ledge you just climbed down from. Follow the rocky wall directly in front of Lara to the right along a path between a ruined wall and a rocky wall where you will find another BRONZE REWARD. You could also have climbed the ledge that the mercenary near the base of the slope was and followed the path back to this spot. Both ways are available, depending on your preference. Return to the last ledge you descended, and climb back up. Get on the vine, and climb the vine before swinging to the other side. If you don't climb, Lara will drop to the ground and not be able to reach the other side of the gap, unless you are swinging at maximum speed. At the top of the ledge, slide down the next slope and have your guns ready. Using your environmental hazards button, you can shoot the pillar which will topple down on one of the two mercenaries. Kill the other while using appropriate moves to dodge. Across the fallen stone pillar awaits a mercenary. Kill him and then turn right towards the black SUV. Two mercenaries wait to be greeted by Lara's guns on the right of the SUV. Instead of ascending the steps of the Temple, climb atop the ledge that is directly left on the stair railings. Climb the second ledge and then turn left. Hidden inside a secret hollow is an interactable wall. Fire at it and it will crumble revealing a SILVER REWARD. Now climb the stairs and a cutscene will show two chicken mercenaries fleeing into the Temple, moments before they scream from a mysterious death.
TEMPLE ENTRANCE HALL- 1 Bronze Reward
Enter the temple through the entrance atop the stone staircase. Follow a short flight of steps down to a dusty floor where two small, interactable rocks wait to be kicked so as to reveal the trap, and a shiny hook up above foreshadows using the grapple. The floor ahead retracts and reveals spinning spike poles. Falling from your grapple or not making the jump across will result in immediate death. Swing to the other side. Activating the PLS is a good idea now that you're inside the Temple. Follow the few steps up into the next chamber. Before entering the chamber where several chains are visible, turn to the left and traverse the crumbled passage tucked in the left corner. Inside the crumbling room is a BRONZE REWARD. Leave the crumbling passage and enter the room with chains. A short sequence will ensue showing the way up and out.
CHAMBER WITH CHAINS AND CLANKING SOUNDS
For this sequence, you can refer to my below diagram. The only accessible chain from the ground level does not move while Lara is on it. Climb onto it, and climb as high as you can before you come to the block that prevents you from going further. The next segment here is timed. Jump backwards onto the MOVING CHAIN, which will begin to lower. Use the fast-motion button to assist you in climbing the chain faster. Climb up to the block on the MOVING CHAIN, and then jump backwards again onto the STATIONARY CHAIN. From there, jump onto the platform to exit the chamber.
Walking across the short stone passage, you can ignore the chain and safety drop to the base of the next chamber. If you desire to go back anywhere after and including the Temple exterior, you can do so by accessing this chain, which is a Moving Chain like the one in the previous chamber.
UNDERWATER (FLOODED) TEMPLE PASSAGE- 1 Bronze Reward
Exiting the chamber with the moving chain, follow the passage down a hall that ends by a pool of water. Descend in the water, and once at the bottom, turn right and swim along the flooded passage. Remember to use your fast-motion button to avoid drowning. Once you make it to the sharp turn in the water, instead of progressing, ascend to the surface. If you have trouble locating the sharp turn, look for a brighter area, and ascend there, or try activating your PLS if you have not already been using it. Climb onto the stone surface and collect the BRONZE REWARD behind the stone rubble. Standing on the edge of the stone surface, facing the water, jump to the right (in the water) and descend beneath the surface again. Follow the submerged rock wall on your right which will meet a more flat rock wall. At the flat wall, ascend to the surface and climb out of the water.
HALL WITH CLOSING-IN WALLS
Down a flight of steps is a jaguar, waiting to eat you. If you stand on the steps to shoot, he will not bother you, but if you stand on the same level as him, he will thirst for your warm blood. Dispatch him, and then continue down the steps. Pay attention to the dark scratch marks in the floor ahead, these mark the two walls which smash against each other in the middle of the hallway. Wait for them to smash together, and then once they begin to separate, run through. The hall turns to the left to two sets of smashing walls. This time, simply running through is not an option. Grab the crate nearby and push it directly in the center of the smashing walls (if you don't align the crate correctly, the walls will). Push the crate through the first set of walls. Once you are safe in the second set of walls, abandon the crate, climb on top of it, and jump out onto the other side of the smashing walls. If you continue up another flight of steps, you will follow it out into the largest Temple chamber yet.
CHAMBER WITH ROTATING GEARS AND PRESSURE PLATES- 1 Bronze/ 1 Silver Reward/ 1 Gold Reward
The following chamber has multiple things to explore. First, a jaguar lurks in the watery level beneath the raised platform you enter the chamber on. You may want to kill him early on. Standing on a crate will not prevent him from reaching you. If you try to shoot him from on top of the raised platform, he will attempt to escape your line of sight, but you can still accomplish dispatching him this way. From the chamber entrance, turn right and go past the crate, which we'll come to later. Climb the ledge near the chain on the far right side to collect a BRONZE REWARD. Not to deal with the pressure pad puzzle. There are three pressure pads around the raised platform. The two pads on the side control the large, rotating gears faceted into the chamber walls. The middle pressure pad controls the door, and chamber exit which sits atop a crumbled flight of steps. You will have to find a way around this. Follow this series of instructions.
1) Near the bronze reward you just picked up is a crate. Move it onto the nearby pressure pad.
2) Jump into the watery ground level and fight off the jaguar if you've not already. On the right side of the area is a crate, pull this around to the other side of the raised platform where a see-saw styled contraption awaits you. Under the raised side of the see-saw is a crate pull it out allowing the see-saw to lower on your current side. Push the crate so that it sits on top of the end (where one would sit were it truly a see-saw). To make sure it is on properly, it helps to push it up as far as you can, and then let it slowly fall. Apply force when necessary.
3) Climb onto the raised platform and walk along the middle stretch that juts out into the middle of the chamber. Step on the middle pressure pad to initiate a sequence showing you the exit to the chamber. At the end of the middle platform is a small stretch of broken stairs. Climb to the top of the stairs, and then jump left onto the raised end of the see-saw. The force will cause the crate you positioned on it to fly into the air and land on top of the raised platform.
4) Repeat this process for the second crate.
5) Once both crates are on the raised platform, move them onto the other two pressure pads. Once they are forced down, a sequence will show the final door opening.
GOLD CHALLENGE
For the gold challenge, the objective is to position the chamber exit door so that you can access a secret hollow above it wherein lies the gold reward. So first, take the left crate off the pressure pad (as if just entering the chamber). You will hear the final door slamming up and down, not able to open because the gear on the left side of the chamber is locked. Looking at the gear on the left side wall of the chamber, open the locks and let the door fall all the way down; the gear will begin spinning fast before it stops. Move the center crate back onto the center pressure pad. Now watch the door as you do this; The exit door has two walls on both sides of it. About halfway up those walls are distinct black crevices that mark the point we will be examining. Step on the pressure pad, and as the bottom of the door reaches the black crevice, step off. The door should be stuck halfway open. Now proceed to the left of the raised platform to where a chain moves up and down. Climb up onto the ledge next to it which will allow you to jump onto the chain. Once on, climb up the chain and then transpose Lara from the chain to the ledge near the top. Climb around the ledge, vault up the higher ledge, and climb onto the platform above. Grab the chain that elevates over the two stone platforms and the slope that runs down the middle. Take care not to fall onto the slope! Swing across to the other side, and once on that platform, safety drop to the ledge, and then the ledge below. Shimmy to the right until Lara is prompted to jump to the role that sticks out from the wall. Jump from the pole to the platform where the exit door to the chamber is. On either side of the door two ledges you can vault up. Once on the second ledge, jump onto the ledge that is on the door. Vault up to the higher ledge, and as the door moves to its peak, jump up and grab the higher ledge. Claim your GOLD REWARD.
We are almost finished in this mammoth of a level, but there is one more reward to get before we are done. To the right of the chamber exit door is a wall much like the one you climbed down from the platform with the chain, ledges, and pole. Jump and grab the ledge and shimmy across the wall until another ledge can be accessed above you. Grab the chain, swing across the slope, and claim the SILVER REWARD. Return to the exit chamber door and pass through.
INTERACTIVE CUTSCENE
Proceeding out of the large chamber with the pressure pads, an interactive cutscene sends deadly blades towards Lara. You will have to press two buttons to survive the encounter, which are specific to each console, respectively. Along the way, you glimpse a peak of the next silver reward. After the interactive cutscene, the following areas have become unavailable.
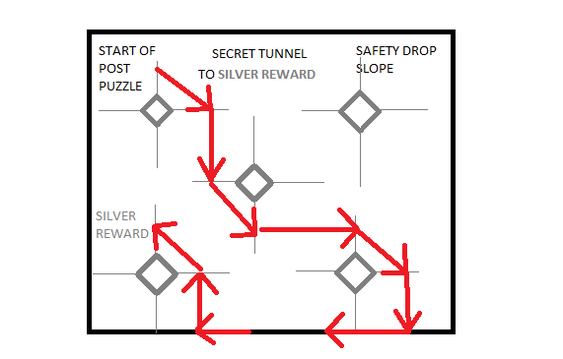
LONG HALL AND ROOM WITH ROTATING POSTS- 1 Silver Reward
After the cutscene, follow the long, dark hall to a pitch black room. Drop to the ledge, and shimmy to the right as far as you can. Drop to the two ledges below you, followed by landing on the ground. Watch out for the jaguar that lurks below, and take care of that kitty. Now for the silver reward we saw in the interactive cutscene. Between the slope that you safety dropped on from the ledge high above and the brightly-lit area where you would stand on to reach the spinning posts is a small section of the wall that Lara can interact with. Push the wall in as far as it can go, and then turn right. Proceed down the tunnel which empties into the pit that had been beneath Lara in the interactive cutscene. Immediately on the left is the SILVER REWARD. Return to the room with the rotating posts. You can reference my below picture for additional assistance. Begin at the top of the brightly lit pile of stones and jump onto either of the two poles on the first post. By simply following either path by jumping when necessary, you will end up on a ledge on the other side of the room. Shimmy as far as you can to the right, then vault up to the higher ledge. Shimmy to the right again, and then vault up. Shimmy to the left and jump to the second ledge at that height, to your left. Shimmy around the corner and drop to the ground. Climb up the nearby ledge, and then proceed down the long dark hallway. There are boulders that block your path which you can easily bypass. At the end of the hall, turn left and then as you approach the Temple exit, a cutscene is triggered.
UNDERWATER (FLOODED) TEMPLE PASSAGE- 1 Bronze Reward
Exiting the chamber with the moving chain, follow the passage down a hall that ends by a pool of water. Descend in the water, and once at the bottom, turn right and swim along the flooded passage. Remember to use your fast-motion button to avoid drowning. Once you make it to the sharp turn in the water, instead of progressing, ascend to the surface. If you have trouble locating the sharp turn, look for a brighter area, and ascend there, or try activating your PLS if you have not already been using it. Climb onto the stone surface and collect the BRONZE REWARD behind the stone rubble. Standing on the edge of the stone surface, facing the water, jump to the right (in the water) and descend beneath the surface again. Follow the submerged rock wall on your right which will meet a more flat rock wall. At the flat wall, ascend to the surface and climb out of the water.
HALL WITH CLOSING-IN WALLS
Down a flight of steps is a jaguar, waiting to eat you. If you stand on the steps to shoot, he will not bother you, but if you stand on the same level as him, he will thirst for your warm blood. Dispatch him, and then continue down the steps. Pay attention to the dark scratch marks in the floor ahead, these mark the two walls which smash against each other in the middle of the hallway. Wait for them to smash together, and then once they begin to separate, run through. The hall turns to the left to two sets of smashing walls. This time, simply running through is not an option. Grab the crate nearby and push it directly in the center of the smashing walls (if you don't align the crate correctly, the walls will). Push the crate through the first set of walls. Once you are safe in the second set of walls, abandon the crate, climb on top of it, and jump out onto the other side of the smashing walls. If you continue up another flight of steps, you will follow it out into the largest Temple chamber yet.
CHAMBER WITH ROTATING GEARS AND PRESSURE PLATES- 1 Bronze/ 1 Silver Reward/ 1 Gold Reward
The following chamber has multiple things to explore. First, a jaguar lurks in the watery level beneath the raised platform you enter the chamber on. You may want to kill him early on. Standing on a crate will not prevent him from reaching you. If you try to shoot him from on top of the raised platform, he will attempt to escape your line of sight, but you can still accomplish dispatching him this way. From the chamber entrance, turn right and go past the crate, which we'll come to later. Climb the ledge near the chain on the far right side to collect a BRONZE REWARD. Not to deal with the pressure pad puzzle. There are three pressure pads around the raised platform. The two pads on the side control the large, rotating gears faceted into the chamber walls. The middle pressure pad controls the door, and chamber exit which sits atop a crumbled flight of steps. You will have to find a way around this. Follow this series of instructions.
1) Near the bronze reward you just picked up is a crate. Move it onto the nearby pressure pad.
2) Jump into the watery ground level and fight off the jaguar if you've not already. On the right side of the area is a crate, pull this around to the other side of the raised platform where a see-saw styled contraption awaits you. Under the raised side of the see-saw is a crate pull it out allowing the see-saw to lower on your current side. Push the crate so that it sits on top of the end (where one would sit were it truly a see-saw). To make sure it is on properly, it helps to push it up as far as you can, and then let it slowly fall. Apply force when necessary.
3) Climb onto the raised platform and walk along the middle stretch that juts out into the middle of the chamber. Step on the middle pressure pad to initiate a sequence showing you the exit to the chamber. At the end of the middle platform is a small stretch of broken stairs. Climb to the top of the stairs, and then jump left onto the raised end of the see-saw. The force will cause the crate you positioned on it to fly into the air and land on top of the raised platform.
4) Repeat this process for the second crate.
5) Once both crates are on the raised platform, move them onto the other two pressure pads. Once they are forced down, a sequence will show the final door opening.
GOLD CHALLENGE
For the gold challenge, the objective is to position the chamber exit door so that you can access a secret hollow above it wherein lies the gold reward. So first, take the left crate off the pressure pad (as if just entering the chamber). You will hear the final door slamming up and down, not able to open because the gear on the left side of the chamber is locked. Looking at the gear on the left side wall of the chamber, open the locks and let the door fall all the way down; the gear will begin spinning fast before it stops. Move the center crate back onto the center pressure pad. Now watch the door as you do this; The exit door has two walls on both sides of it. About halfway up those walls are distinct black crevices that mark the point we will be examining. Step on the pressure pad, and as the bottom of the door reaches the black crevice, step off. The door should be stuck halfway open. Now proceed to the left of the raised platform to where a chain moves up and down. Climb up onto the ledge next to it which will allow you to jump onto the chain. Once on, climb up the chain and then transpose Lara from the chain to the ledge near the top. Climb around the ledge, vault up the higher ledge, and climb onto the platform above. Grab the chain that elevates over the two stone platforms and the slope that runs down the middle. Take care not to fall onto the slope! Swing across to the other side, and once on that platform, safety drop to the ledge, and then the ledge below. Shimmy to the right until Lara is prompted to jump to the role that sticks out from the wall. Jump from the pole to the platform where the exit door to the chamber is. On either side of the door two ledges you can vault up. Once on the second ledge, jump onto the ledge that is on the door. Vault up to the higher ledge, and as the door moves to its peak, jump up and grab the higher ledge. Claim your GOLD REWARD.
We are almost finished in this mammoth of a level, but there is one more reward to get before we are done. To the right of the chamber exit door is a wall much like the one you climbed down from the platform with the chain, ledges, and pole. Jump and grab the ledge and shimmy across the wall until another ledge can be accessed above you. Grab the chain, swing across the slope, and claim the SILVER REWARD. Return to the exit chamber door and pass through.
INTERACTIVE CUTSCENE
Proceeding out of the large chamber with the pressure pads, an interactive cutscene sends deadly blades towards Lara. You will have to press two buttons to survive the encounter, which are specific to each console, respectively. Along the way, you glimpse a peak of the next silver reward. After the interactive cutscene, the following areas have become unavailable.
LONG HALL AND ROOM WITH ROTATING POSTS- 1 Silver Reward
After the cutscene, follow the long, dark hall to a pitch black room. Drop to the ledge, and shimmy to the right as far as you can. Drop to the two ledges below you, followed by landing on the ground. Watch out for the jaguar that lurks below, and take care of that kitty. Now for the silver reward we saw in the interactive cutscene. Between the slope that you safety dropped on from the ledge high above and the brightly-lit area where you would stand on to reach the spinning posts is a small section of the wall that Lara can interact with. Push the wall in as far as it can go, and then turn right. Proceed down the tunnel which empties into the pit that had been beneath Lara in the interactive cutscene. Immediately on the left is the SILVER REWARD. Return to the room with the rotating posts. You can reference my below picture for additional assistance. Begin at the top of the brightly lit pile of stones and jump onto either of the two poles on the first post. By simply following either path by jumping when necessary, you will end up on a ledge on the other side of the room. Shimmy as far as you can to the right, then vault up to the higher ledge. Shimmy to the right again, and then vault up. Shimmy to the left and jump to the second ledge at that height, to your left. Shimmy around the corner and drop to the ground. Climb up the nearby ledge, and then proceed down the long dark hallway. There are boulders that block your path which you can easily bypass. At the end of the hall, turn left and then as you approach the Temple exit, a cutscene is triggered.
THE STONE DIAS
After the encounter with James Rutland, you must begin immediately running along the bridge. Jump over the first hole that the helicopter shoots out, and then the second gap between the bridge and the dais. There are eight mercenaries between you and the end of the level. Once you beat them, a final cutscene occurs.
After the encounter with James Rutland, you must begin immediately running along the bridge. Jump over the first hole that the helicopter shoots out, and then the second gap between the bridge and the dais. There are eight mercenaries between you and the end of the level. Once you beat them, a final cutscene occurs.
Croft Manor Tutorial Level To Next Level: Level 2- Peru
