LEVEL 2: PERU
A hint from James Rutland leads Lara to believe that the mystery of the sword surrounds an expedition Lara did sometime during her years in the university. It was a fatal mission to Paraiso, Peru that killed off many of Lara's friends. The level begins in a small town in Paraiso, where the villagers hide inside their houses. Lara is to meet her longtime friend, Anaya Imanu here before leaving to the excavation site.
Level Objective: Explore the ruins in Paraiso for signs of your friend, Amanda, and finish the work you began years before.
Rewards: 8 Bronze/ 2 Silver/ 1 Gold
Level Objective: Explore the ruins in Paraiso for signs of your friend, Amanda, and finish the work you began years before.
Rewards: 8 Bronze/ 2 Silver/ 1 Gold
WALKTHROUGH:
TOWN ENTRANCE- 1 Bronze Reward
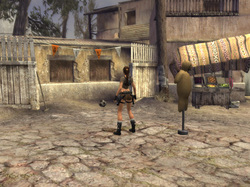
After a short cutscene of Lara at Croft Manor, and then another of Lara entering the desolate village in Paraiso, you'll begin by the town gate. Walk back into the first alley on your right. Turn left down the alley and climb on top of the ledge built into the back of the house on your left. Climb onto the roof. From where you climbed up, go straight and jump and grapple swing across to the roofs on the other side of the road. Looking down in the secret area, you can grapple a BRONZE REWARD, tucked away in the shade of the narrow alley. Jump back down into the road. Walking forward will to you to a turn in the road where a dummy sits on a pole, and a soccer ball sits on the ground, waiting for Lara to kick. You can shoot the dummy, but nothing will happen. So turn left and follow the road forward, under the town archway, and into the marketplace where Anaya's jeep waits by a statue of a man on a horse. A cutscene shows Lara and Anaya meeting up. Anaya is hesitant to take Lara to the excavation site, and mercenaries barge into the area.
TOWN SQUARE- 2 Bronze Rewards/ 1 Silver Reward
First, use your environmental hazard button on the truck which will explode, hopefully killing a nearby mercenary or two. A cart rests nearby with barrels on it. A mercenary has chosen this for cover. One of the barrels is filled with oil. Once you shoot the cart, and the barrels begin rolling down, use your environmental hazard button to kill the nearby mercenary. One mercenary sits behind the cover of boxes near the truck. Dispatch him to continue. Back by the barrels, again, is another mercenary sitting behind two barrels (darn...non-explosive). Shoot him. If you have killed the first four mercenaries already, a short sequence will show some more coming out from the nearby market shops. Another explosive barrel is nearby which will kill one of the mercenaries upon impact. Four more mercenaries scout the area, three near the previously mentioned barrel, and one who comes over from the barrels on the cart, again. Once you have killed those five mercenaries, a sequence will show a man with a shotgun waiting for Lara on one of the higher levels. If you have picked up an assault rifle by now, pick a nice spot of sun and fire away at the man with the shotgun. You can shoot him through the railings near him.
Now for the bronze rewards. First go over to the shops where the second batch of mercenaries came from. Turn left at the sign with pants on it and pick up the BRONZE REWARD tucked back in the corner to your left. Next, go to the church near the truck, where you began the fighting, and notice the busted railing on the right (as if Lara's back was facing the church doors). Run and jump straight out from the broken railing to land on top of a stall. From there you can access the awning of the nearby building, on the other end of the stall. Once there, you will noticed two horizontal flagpoles sticking out, and a bronze reward on the awning on the other side of the gap. Swing across and pick up the BRONZE REWARD, or just use your grapple to hook from the first awning. But a zip line awaits the person who swings across on the flagpoles. So choose your way to get the reward, and then go back down to the church.
Down the stairs of the church, to the left, is a vertical flagpole. Lara can climb this to access the nearby raised walkway. To the right of the broken railing is a door. Kick open the door with the interact button and inside you will find a SILVER REWARD. Exit the room back to the raised walkway. Once atop the raised walkway, find the space where the railings are missing, and Lara will be prompted to use her grapple. Jump over the gap, activate the grapple, and swing across the telephone pole to the adjacent high walkway. Continue over to the broken door where you can pick up the shotgun left over by the man you picked off from the ground. Inside the room is a man waiting for you. Shoot him. On a table rests three grenades. Pick them up because they will be useful.
TOWN ROAD- 1 Bronze Reward
The room opens out onto a slightly sloped rooftop. From here there is an environmental hazard barrel down on the ground that you can shoot. A mercenary is on a nearby balcony. There is then three mercenaries on the ground, and one on the other side of the road on a raised walkway. Another mercenary is on another balcony. Kill the five mercenaries to continue. From your location on top of the slightly sloped rooftop, grapple swing across the road from the telephone pole and land on another rooftop. From this rooftop, walk into the room nearby. There are two doors. One on the left is a balcony and the one in front of you is another balcony. Take the one in front of you where a mercenary waits. Kill him and then dispatch the one on the ground. From the balcony, walk onto the adjacent rooftop and watch as a mercenary truck swoops in and knocks the telephone pole off balance. A new environmental hazard has appeared which hangs at the top of the telephone pole and will fall on top of the man operating the truck's built-in turret. Shoot it down. Two mercenaries come around the corner. Dispatch them and take to the ground. Backtrack a little to gather any necessary ammunition and health packs, and then find the nearby town gate. With your back to the gate, to the first left down a small alley. Once in the back alley, turn right to see the hidden BRONZE REWARD. Collect it and then continue towards the truck with the turret again. Turning left at the truck, the end of the town road is visible, and the Ducati that sits in patience behind two to three armed mercenaries. Once you kill them, you can approach the bike. A short cutscene shows a dirty Lara approaching the bike.
PERUVIAN ROAD (MOTORCYCLE SEQUENCE)
This section of the game is timed. You need to pretty much be accelerating the whole time to make it to Anaya before the mercenaries close in on her. Zip will give you two warnings before he tells you that the mercenaries got Anaya. There are no rewards in this sequence, so ride straight through. Look out for environmental hazards on the road as they will help with the biker mercenaries. Some parts of the road will be blocked off. Either shoot them down, or use the obvious ramps to ride over them. There are nine mercenaries to kill. You will not be able to make it to the bridge until all nine are dead. So don't simply ignore them on the roads...shoot them! Once you come to the bridge, veer to the right, and then to the left to hit the ramp that will take you over the gaping chasm. In the air, steer the bike so you will land relatively on the right side of the bridge. Take the ramp and make it to safety on the other side. Two health packs wait for you in case you are in need of medical attention. There are between ten and twelve mercenaries you have to kill to continue, on the other side of the bridge. Once they are dead, you will steer through a stone archway and out onto the large, main road with the mercenary trucks. The first truck, driving on the right side of the road, will release boxes from the back. You can shoot them, but there is no point so steer to the left and bypass that truck. Two more trucks blockade you from Anaya's jeep. The back of the truck on the left will lower revealing two mercenaries. Dispatch them, and then the back of that truck will lower allowing Lara to ride up into it. This ends the Peruvian Road (Motorcycle Sequence), triggering a cutscne ein which Lara performs an acrobatic move that not only destroys the trucks, but lands her in Anaya's jeep.
THE TUNNELS (FLASHBACK SEQUENCE)
A cutscene shows Lara and Anaya at the excavation where the mysterious event occurred years before. Lara has a flashback into the past, and you are now able to relive Lara's memory of the tragic incident that claimed her friends' lives. You'll begin on a wooden platform. Descend the stairs and crouch to bypass the low, overhanging wall. Nearby is a slope which you will need to slide down to continue. You will not be able to get back up. At the bottom of the slope, turn left to a pit with a pipe hanging over it. Grab the pipe and swing across to the other side of the pit. Continuing along the path, one of your friends' bodies is thrown near Amanda, followed by the tunnel collapsing. Turn around and go straight until the path turns right. At the curve is a discreet path on the left between some stalactites and stalagmites. Follow the path back into the ruins. Lara sees her friend, Sarah, dead on the ground inside the ruins.
RUINS WITH BROKEN SPEAR TRAP - 1 Bronze Reward
After examining Sarah's body, step onto the pressure pads near her body. Spears will pop out, but hundreds of years of decay causes the trap to break, forming a nice horizontal pole for Lara. There is a crate next to Sarah's body. Push it onto the rightmost pressure pad. Climb onto the crate which gives Lara access to the horizontal "spear" pole. Swing to the ledge in front of you, then climb up onto the raised walkway. Tucked away in the corner on the right is a BRONZE REWARD. Collect it, and then move to the edge of the raised walkway that overlooks the stone face carved into the far wall. Jump onto what looks like his eyebrow, which coincidentally makes a perfect ledge, shimmy to the left as far as you can, and then jump to the platform on the other side.
SECOND CHAMBER WITH SPEARS, ROPE, AND ROLLING BALL
You'll drop into a chamber where Lara sees her friend, Mike, dead on the ground. Another friend, Kent, calls to Lara from the other side of the line of pressure pads, behind a barred doorway. Go to him and listen to what he has to say. He says that he needs Lara's help to get out. Behind the barred doorway, against the activated spears is a rolling ball. Position it so that it is just under the rope, then jump onto the ball, and finally, the rope. Be careful not to let the ball roll onto the pressure pads before you are done with the rope. Once you get onto the high platform, Kent says he thinks he sees a light. Lara tells him to stay there. Walking forward and hanging down on the ledge will activate a cutscene. Kent hears Amanda and runs off, only to be greeted humbly by the Unknown Entity.
INTERACTIVE CUTSCENE
The Unknown Entity has made Lara his new target. You must escape from the Entity before he gets you, and you are seeing this through his eyes, even though you are still in complete control of Lara. Jump over the first low wall of rocks, followed by a second. When you run, you can jump out towards a rope which will then snap, causing Lara to fall (but she won't lost health). You can also just jump down to the ground. The Entity will disappear into the wall ahead, and you are safe for the time being.
CHAMBER WITH ROLLING BALL, SLOPE, PRESSURE PADS, AND HORIZONTAL BAR- 1 Bronze Reward
From where you dropped, run to the left where you can climb up a ledge to find a rolling ball. Push it down the slope nearby. Drop down to the ground again and make sure the ball becomes stationary on the pressure pads near another body. Climb back onto the ledge where the ball was and turn to face the ledge you climbed up. A walkway is only a jump away. Jump on and approach the next barred doorway where Lara sees Amanda, moments before Amanda and another friend are chased off by the Entity. From the raised walkway, walk to the edge opposite the one you climbed up on and jump to the horizontal "spear" bar. Swing to the rope. Make sure Lara is swinging a little faster before abandoning the rope ad landing on the high platform. Before proceeding through the open doorway nearby, turn to your right and collect the BRONZE REWARD tucked away in the shadows near another barred doorway.
TUNNELS WITH SPIKE PIT
Proceed through the open doorway which takes you into more tunnels. Follow the path until you come to a pit of spikes. You'll need to grab the pipe suspended above you to go across. When you drop, proceed into the central ruins chamber where a cutscene will be triggered. Lara and Amanda are cornered by the approaching Entity. Amanda pulls out a stone faceted into a large door that she says will open the way out. When Amanda pulls it out, the Entity vanishes, but the ruins begin to flood. A piece of collapsing roof traps Amanda's foot to the ground and Lara is force to leave her to save her own life, even after trying to help her.
EXCAVATION SITE (BACK TO PRESENT DAY)- 1 Bronze Reward
A cutscene shows Lara and Anaya arguing about whether or not to explore the ruins. After the cutscene, it's time to raid the tomb. Find the broken gasoline tank, the large one, situated near a short wall. Climb the wall behind it, from either side of the tank, and face the wooden shack structure ahead. Inside is a BRONZE REWARD. Collect it, and then continue down the short hill ahead to the large pond.
FLOODED RUINS ENTRANCE
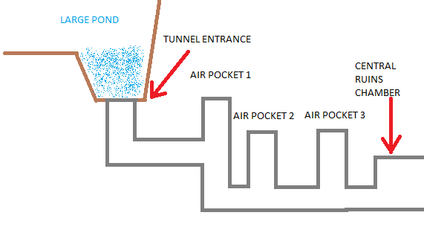
You can refer to the diagram for the way into the Central Ruins Chamber, and for the location of the air pockets so as to avoid drowning. From the large pond, jump into it and swim down through the circular hole in the pond floor. Swim down and, at the bottom, start swimming towards the brightly lit area, which is air pocket one. Swim up to get air, if necessary, if not, swim back down to the very bottom where you can swim through an opening with broken-open bars. Gradually swim down a little lower to enter the Central Ruins Chamber.
CENTRAL RUINS CHAMBER- 1 Silver Reward
Lara is now in the Central Ruins Chamber. To empty out the water, there are four statues holding bright, blue orbs. Swim to each one, in one breath, and use the interact button to pull the orbs out. Once all four are pulled, a cutscene shows the water lowering, and the area is now able to be explored. The next part of the cutscene shows Lara finding Amanda's shoe, and she is now curious as to how Amanda survived. In the chamber, there are four short halls that branch out. The one closest to you now contains the SILVER REWARD. If you already moved, then find the stairs that lead to the door where Amanda pulled out the stone, then on your left, the farthest hall back contains the silver reward. Back by the door whee the stone was, a hole has formed on its surface. Lara can jump through that hole. Approaching the wall with ancient runes with trigger a cutscene where Lara reads a story about the last queen of Tiwanaku, making a connection the the myth of King Arthur.
CRUMBLED HALLWAY WITH HIGH LEDGES
Walk around the wall from which Lara read the story in the cutscene, and enter the long, crumbling hallway. On the left is a ledge. Vault up to the ledge above, and then jump backwards onto a small platform. From the platform, jump towards the slope, which is the brightly lit spot further ahead, and throw your grapple to swing to the next tier. To the right of where you landed is a ledge. Vault up the ledge and the one above it. Standing on the hollowed-out platform in the wall, turn and face the end of the hall where lies another slope and crumbled stairs. Jump out and throw your grapple, swinging onto the top of the stairs.
INTERACTIVE CUTSCENE
From the top of the stairs, follow the hall into a new chamber lined with high walls and a collapsed floor. Approach the collapsed floor to initiate the interactive cutscene. Varying on consoles, you will have to press three buttons. Once you have finished the interactive cutscene, you will be standing in the puzzle room.
PUZZLE ROOM W/ TALL STONE STATUES, PRESSURE PADS, AND CONCENTRATED LIGHT- 1 Gold Reward
From your starting position, turn Lara about 45 degrees to her left and throw the magnetic grapple at the pillar in the wall. When you pull, the pillar falls as well as a rolling ball from on top of it. Take the ball and roll it onto the middle pressure pad which sits further in the puzzle room. A cutscene shows Lara examining a statue that rises from the floor. Take the next ball, located on the left side of the room, and put it into the far right pressure pad. The pressure pads on the side control the two large statues on opposite sides of the room while the middle pressure pads controls the movement of the central statue, which Lara examined. The statue on the left side of the room is broken, so to access the higher areas, you'll have to open the statue on the right side of the room. Imagine left as being the Lara's back facing the collapsed floor. As you roll the ball in, a sequence shows the statue opening up. A concentrated beam of light is shot at the central, raised statue, before being redirected at the giant statue in the middle of the room. Now that the statue on the right has opened up, you can climb it like a ladder. Climb one of the two ladders on either side, and then once you've reached the highest bar, jump to the ledge on the middle of the statue. From there, shimmy to the middle of the ledge, then vault up two more ledges to the ledge where the beams of light are coming from. Shimmy to the far left or right and then jump to the respective ladders. Climb to the top of the statue. Up top, you can see where the concentrated light is coming from, as well as a ball that sits precariously on the edge...look out below. Push the ball off the edge to the ground below. To get back down, either scale the ladders going down, again, or go back to the top of the ladder and jump to the giant statue in the middle of the room. From there you can slide down a slope, drop to a platform from the middle of the tier, and then safety drop from that platform to the ground again. The ball you just pushed down will be sitting in the same pressure pad as the one that you rolled to open up the statue. Roll it around to the pressure pad on the far left of the puzzle room. A sequence shows the central statue opening up. Climb up one of the ladders on the central statue, which will trigger a cutscene where Lara obtains her first sword fragments and realizes where her next stop will be. Then Anaya is patched through to your headset. She tells Lara that the mercenaries are coming.
GOLD REWARD CHALLENGE
Now it is time to make a detour for the Gold Reward. If you are not interested in retrieving it, then I'll tell you when to split. From the high platform that overlooks the puzzle room, turn right and jump to grab the ledge. Vault up to the ledge above, and climb onto the small platform. From there, you can now jump on top of the statue from the left side of the chamber by jumping towards the nearby ladder. Climb to the top. Go down and then up the two little sets of stairs, then jump onto the platform against the far wall. Once there, jump and grab the ledge. Shimmy as far left as you can go. You'll have to jump over a crumbled ledge, and then repeat that again. Continue shimmying left until you cans see three ledges below you. Drop to the platform at the bottom. From the platform, jump to the vine that is suspended over the large collapsed floor and swing to the platform diagonally from you. Here is where you can split to continue without collecting the gold reward. Skip to the next section to continue. To go after the gold reward, grab the rope again. Climb higher on the rope, and then turn Lara so she is facing the broken up platform that is missing two ledges. Make sure she is higher than the second missing ledge. Swing at maximum speed to make sure you grab the ledge. Now shimmy to the left. Jump over the collapsed ledge and continue shimmying until you reach the doorway in the wall. It is beneficial to have your PLS on, here. Immediately inside the room, turn right and follow the slope up to the ball. Push the ball down the slope. The ball will break through the wall and then fall all the way down to the floor with the pressure pads. Exit through the newly made hole in the wall onto the platform below. From there, jump to the statue. You will land on top of the ladder. Take the ladders and ledges back down to the ground floor where the ball sits at the base of the statue on the right side of the room. Roll the ball into the middle pressure pad so there is one ball on the left and right pressure pads, and two balls in the center pressure pad. The small statue between all three pressure pads, which redirected the concentrated beams of light, will elevate even higher. Wait a moment and the GOLD REWARD will be yours for the taking from inside the raised statue. After you've taken the Gold Reward, make your way back to the platform near the rope.
RETURNING TO THE CENTRAL RUINS CHAMBER
It's time to return to the Central Ruins Chamber and make your way out of the ruins to assist Anaya before the mercenaries can get to her. First, jump onto the platform to the right, and then slide down the slope while shooting the two mercenaries that await you at the bottom. In the Crumbled Hallway, you can slide down the slopes. Down the first slope is a mercenary, dispatch him, then slide down the second slope and enter the room where Lara read the runes from the ancient wall. Peering through the hole in the wall, you are able to see that mercenaries infest the area. Use the cover of the hole in the wall to shoot the three mercenaries. Directly opposite the Central Ruins Chamber from the hole in the wall is a rope that dangles from above. Climb to the top, and swing into the low semicircle tunnel which you had initially swum through. Walk forward and grab the ledge on the right side of the first wall that blocks your path, and vault up to the next tier. Ahead is a metal ladder. Climb the ladder and pass through the broken barred arch, turn left, and climb the ledges to the next tier. A mercenary has his back turned. If you have a grenade, he will not be able to detect it in time, and will die upon impact. Proceed over a crumbled wall to the rope further ahead. Climb the rope out of the drained pond and watch as two mercenaries turn their backs as they proceed away from the drained lake. Jump onto the land, and begin firing at the nine mercenaries that lurk around the excavation site. After you kill them, a short sequence shows a mercenary firing at Anaya who is hiding under the jeep. Kill him from your position, and then enjoy a nice cutscene between Anaya and Lara before finishing the level. Lara thinks that Amanda may have found something that she wanted to keep to herself, and then makes plans to head to Japan.
To Previous Level: Level 1- Bolivia To Next Level: Level 3- Tokyo
